Showing posts with label Archer Surface Detail. Show all posts

Friday, 25 January 2019

Merrie Carlisle Progress...

An incomplete Merrie Carlisle had a test run on the club layout in Carlisle recently, she went well and was well received by the members.


The smokebox has yet to be soldered into place and at this stage the wrapper has no rivet detail, nor do the cab side sheets. I plan to add the rivets later when construction is complete and I've done some research into the possibilities, of which there are four...

1. Brass rivets soldered or glued into appropriate holes. The rivets heads on the real engine are 3/4" d. which in 1:43 scale is 0.435mm. I think 0.5 would be near enough, though I'm sure drilling 250 rivet holes would be a task expensive in small drills.

2. HGW cast resin transfer rivets seemed a good idea and indeed they are very effective, easy to work with and leave no backing on the model as this is peeled away after the transfer sets. Unfortunately they're too small for gauge O locomotives as they're designed for model aircraft, 0.25 is the largest diameter of rivet they make and though they're fine for aircraft, to us they're mere pimples.

3. Archer Surface Detail transfer rivets are the favourite at the moment, they make O gauge rivets about the right size which adhere well to the primer coat. I've experimented and rubbed them with my finger and they stay put. They stand proud of the surface of the model by 0.12mm which is nearly 1/4" and a little on the low side compared to a brass rivet. I'll have to try them and see how convincing they are, this is after all an experiment. Another reservation I have is that the resin rivets are carried on a carrier film though this is very thin and I think will disappear under the paint.

4. Small Shop produce a "Nutter" tool which makes rivet and nuts and bolt heads that are glued in place with varnish. I've only seen a video of this in action but on the face of it the tool looks like a viable though rather expensive proposition.


The wheels are insulated at the rim and and are cast and turned to size by JPL Models.


The motor is restrained by a vertical member which engages in a hole in the top of the motor.
I may replace the M1824 with a more powerful M1833 if the locomotive proves underpowered, I think there's probably room for one.

The front wheels are sprung individually, following Geoff Holt's example, this arrangement is just visible bottom right.


There is a very visible void beneath the boiler so inside motion will have to be fitted, though I don't know whether I can make it work.


The upper part of the motion plate is in place between the upper part of the frames, which are attached to the footplate. The lower part of the motion plate will be attached to the working frames below and will carry the slide bars and provide support for the valve rods. The LNWR Precedents were fitted with Alexander Allan's straight link valve gear, mine will be fitted with the nearest to that ideal that I can manage.


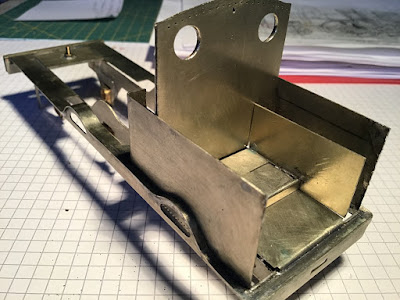
The brass backhead casting is from LGM and has been narrowed at the sides because of the intrusion of the wider than scale cab splashers in O gauge fine scale. Recesses in the upper floor are for wooden inserts. There's a wealth of detail to go in the cab, it's a busy place. 

Electrical pick-up is by the so called American system, the current is led from the tender to the motor through the drawbar, which is insulated from the engine, using a method described by Nick Baines. I've attached a pick-up wire to the drawbar at the tender end which bears on the bottom of the tender floor above to ensure a good contact. Without this addition contact with the tender was uncertain and resulted in uneven running.


There's only a 9" gap between buffer beam and smokebox front so it's a tight fit for the cylinder lubricators which were modified for this situation from LGM castings.

Saturday, 29 December 2018

Merrie Carlisle...first moves.

King Arthur lives in Merrie Carlisle,
And seemly is to see
And there with him Queen Guinever
That bride so bright of blee 

When I mentioned recently that I intended to make a start on a model of the LNWR's "Merrie Carlisle", one of the club members at CDOGG remarked that a plain engine such as a Precedent should provide few problems, well I beg to differ, it's just one problem after another. Of course that's probably because it's a scratch built engine and as such it's a prototype and I'm running into all the problems and unforeseen snags that are bound to crop up building any prototype. So it has been slow going, a tale of trial and error and of two steps forward and one step back! Nevertheless, as the accompanying pictures show I have the beginings of a Precedent taking shape in the studio. There are no correct Slaters' wheels available for this engine, which I mentioned to their technical department, however my revelation was met with a decided lack of interest. So I sourced the wheels from JPL Models and I have them in hand now, they are cast iron and nicely turned to size though demanding a good deal of work on the spokes to finish them. My drawing of the engine shows 6ft 9"wheels, those made for me by JPL are, at my insistence, 6ft 6" across the treads, though they measure 7ft across the flanges; I hope that the splashers will house the wheels without having to be made oversize. The boiler will have to be cut away to allow the front driving wheels clearance, a necessary compromise when working in gauge O fine scale and a reminder that this is a model, not the real thing.

There is a kit available for an LNWR Precedent from Mercian Models (ref. LNW1 @ £250 ) which is based on the old Modeller's World kit, however I chose the scratch building route as I thought it probably less bothersome and a good idea to put the saving into some quality brass castings.


"Merrie Carlisle" was built at the LNWR's Crewe Works in 1894 as number 860 and took its name from the opening line of a fifteenth century poem, "The marriage of Sir Gawain". It was one of only four Precedents turned out in the LMS red livery after the grouping and at the moment it is in that guise as LMS 5050 that I intend to finish the engine.


Note the double skinned cab spectacle plate. Rivets are absent from the cab sides though I intend to add them from Archers' Surface Detail resin transfers at a later stage.

Frames are cut from 0.7 nickle silver and are a respectable 27mm wide. The troublesome curly footplate is from 0.4 n/s.
Cab floor in place with locations for square wooden inserts on the upper level. The distance between splashers on the real engine is a miserly 4ft 3". The model splashers are only 3ft 10" apart, leaving even less working space for the crew.

Slaters' brass hornblocks slide in slots in the 0.7mm frames and are held in place by an "L" shaped keeper plate.  

The frames stop short of the open footplate behind the buffer beam. The wider cosmetic front frames are attached to the footplate and overlap the working frames in an obvious manner though when the wheels are in place the join is hardly noticeable.

Saturday, 17 October 2015

Lybster HR53 Recent Progress


Lybster HR53 ready for a run at the CD0GG Running Day

The sheet-metal work of the superstructure is nearly complete now though it's been a case of one step forward and two steps back recently as the shape of the cab cut-out is still not right and needs to be carefully re-shaped to capture the character of the prototype. Before I took the engine to Carlisle to the club running day today I cleaned the wheels, which were starting to show signs of rust, due I'm sure to fumes from the flux I'm using, I'm tempted to return to "Fluxite" though the greasy nature of this is in turn a cause for concern, it being difficult to eliminate entirely .

Lybster's previous outing on the club layout revealed a problem which hadn't showed up at home on my test track. Each time the engine passed a particular place on the layout she faltered slightly, or at slow speeds stopped entirely! Opinion leaned towards a short caused by the bogie wheels coming into contact with the splashers and indeed it proved that this was indeed the case when I experimented back at home...too much play on the wheels. A simple slim washer remedied the situation. Today on the club layout she ran smoothly past the place which had so recently proved her nemesis and, despite carrying little weight as yet, she made light work of a dozen chunky wagons.  


Lybster HR53 superstructure progressing well though the shape of the cab opening remains to be refined.  


One of the benefits of being a member of a club is the expertise among the members that can be called on to help a project along; both chimney and dome in this case were turned for me by club members with more engineering skill than myself. I drilled the dome for the safety valves which are mounted on top, these are short lengths of tube to which washers will be soldered to form the upper rim. It is my intention to use rivets from the "Archer Surface Detail" range of relief transfers to represent the circle of rivets on the rear of the smokebox and indeed in several other locations around the engine including the long row of rivets along the tank tops that hold the outer casing that bridges the boiler in place. I've done a little experimenting with Archer's relief transfers and I think they're robust enough for the job as well as looking the part.
The brake cylinder is in place beneath the cab and so is the transverse brake cross shaft, there's a good deal more detail to make in this area.
I'm working on a master pattern for the tank top water-fillers as there is no commercial casting available. I'll make a Silicone Rubber mould from the pattern and cast them in white metal though the upright closing handle will have to be made from brass due to its vulnerability.