Showing posts with label Invertrain. Show all posts

Monday, 17 April 2023

HR 8-ton double-deck sheep van with planked sides in 7mm scale.


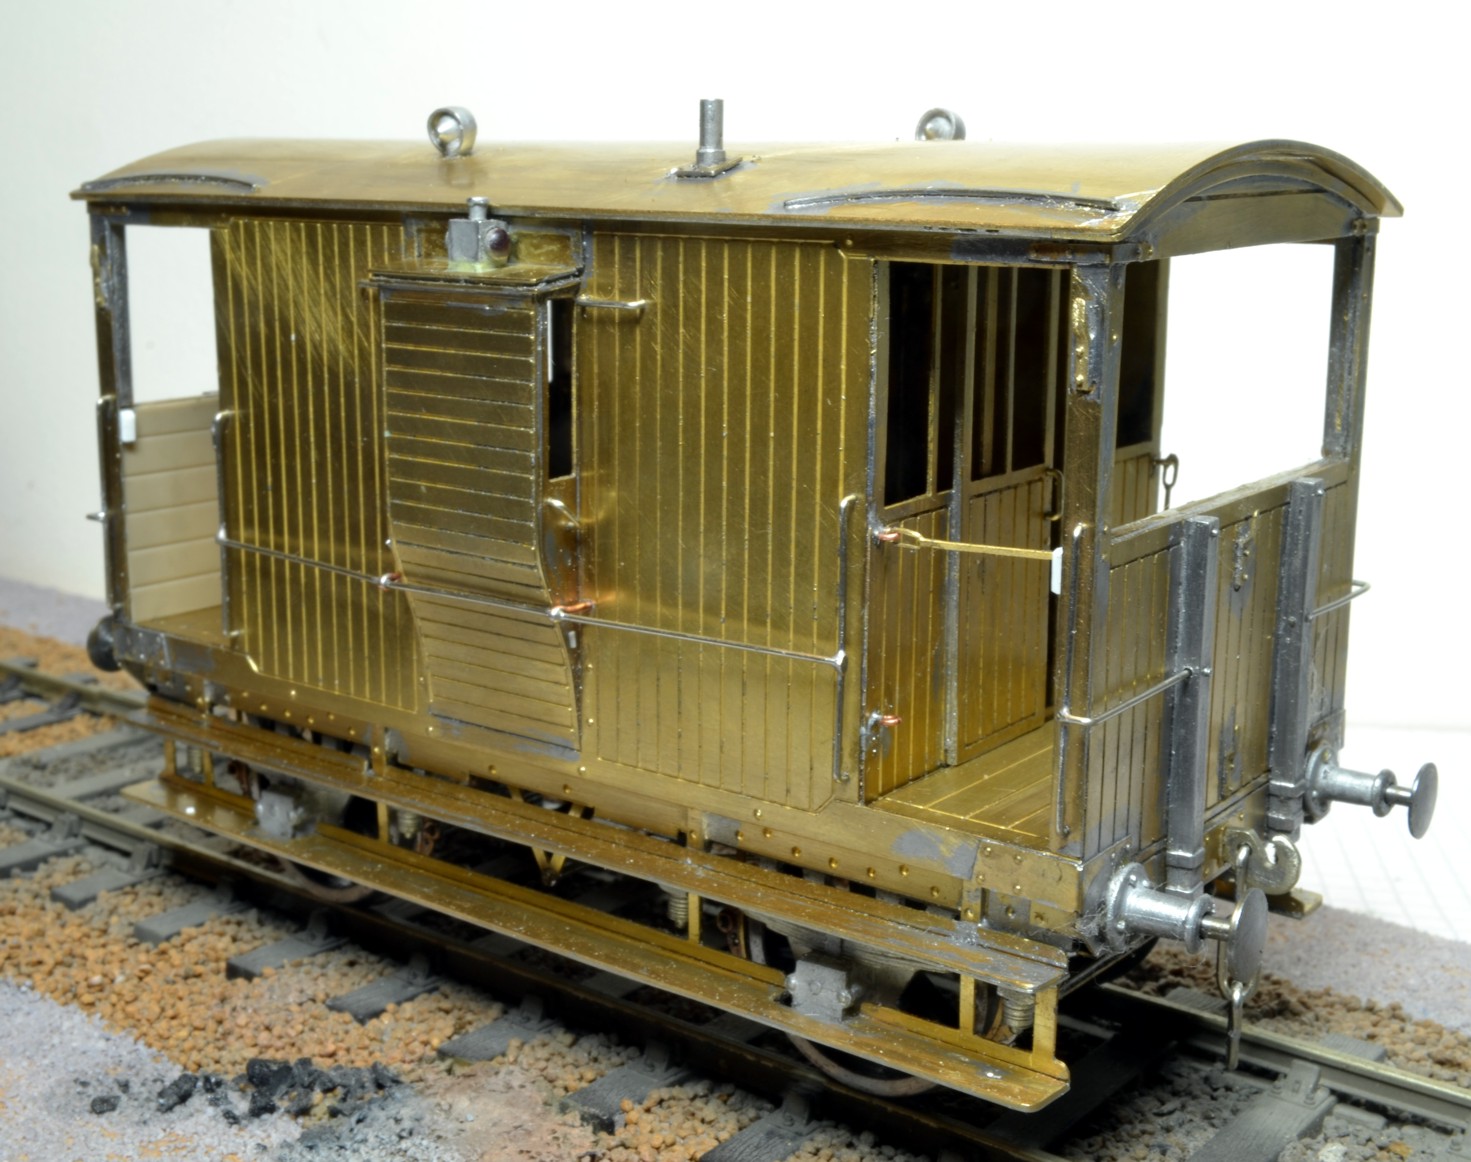
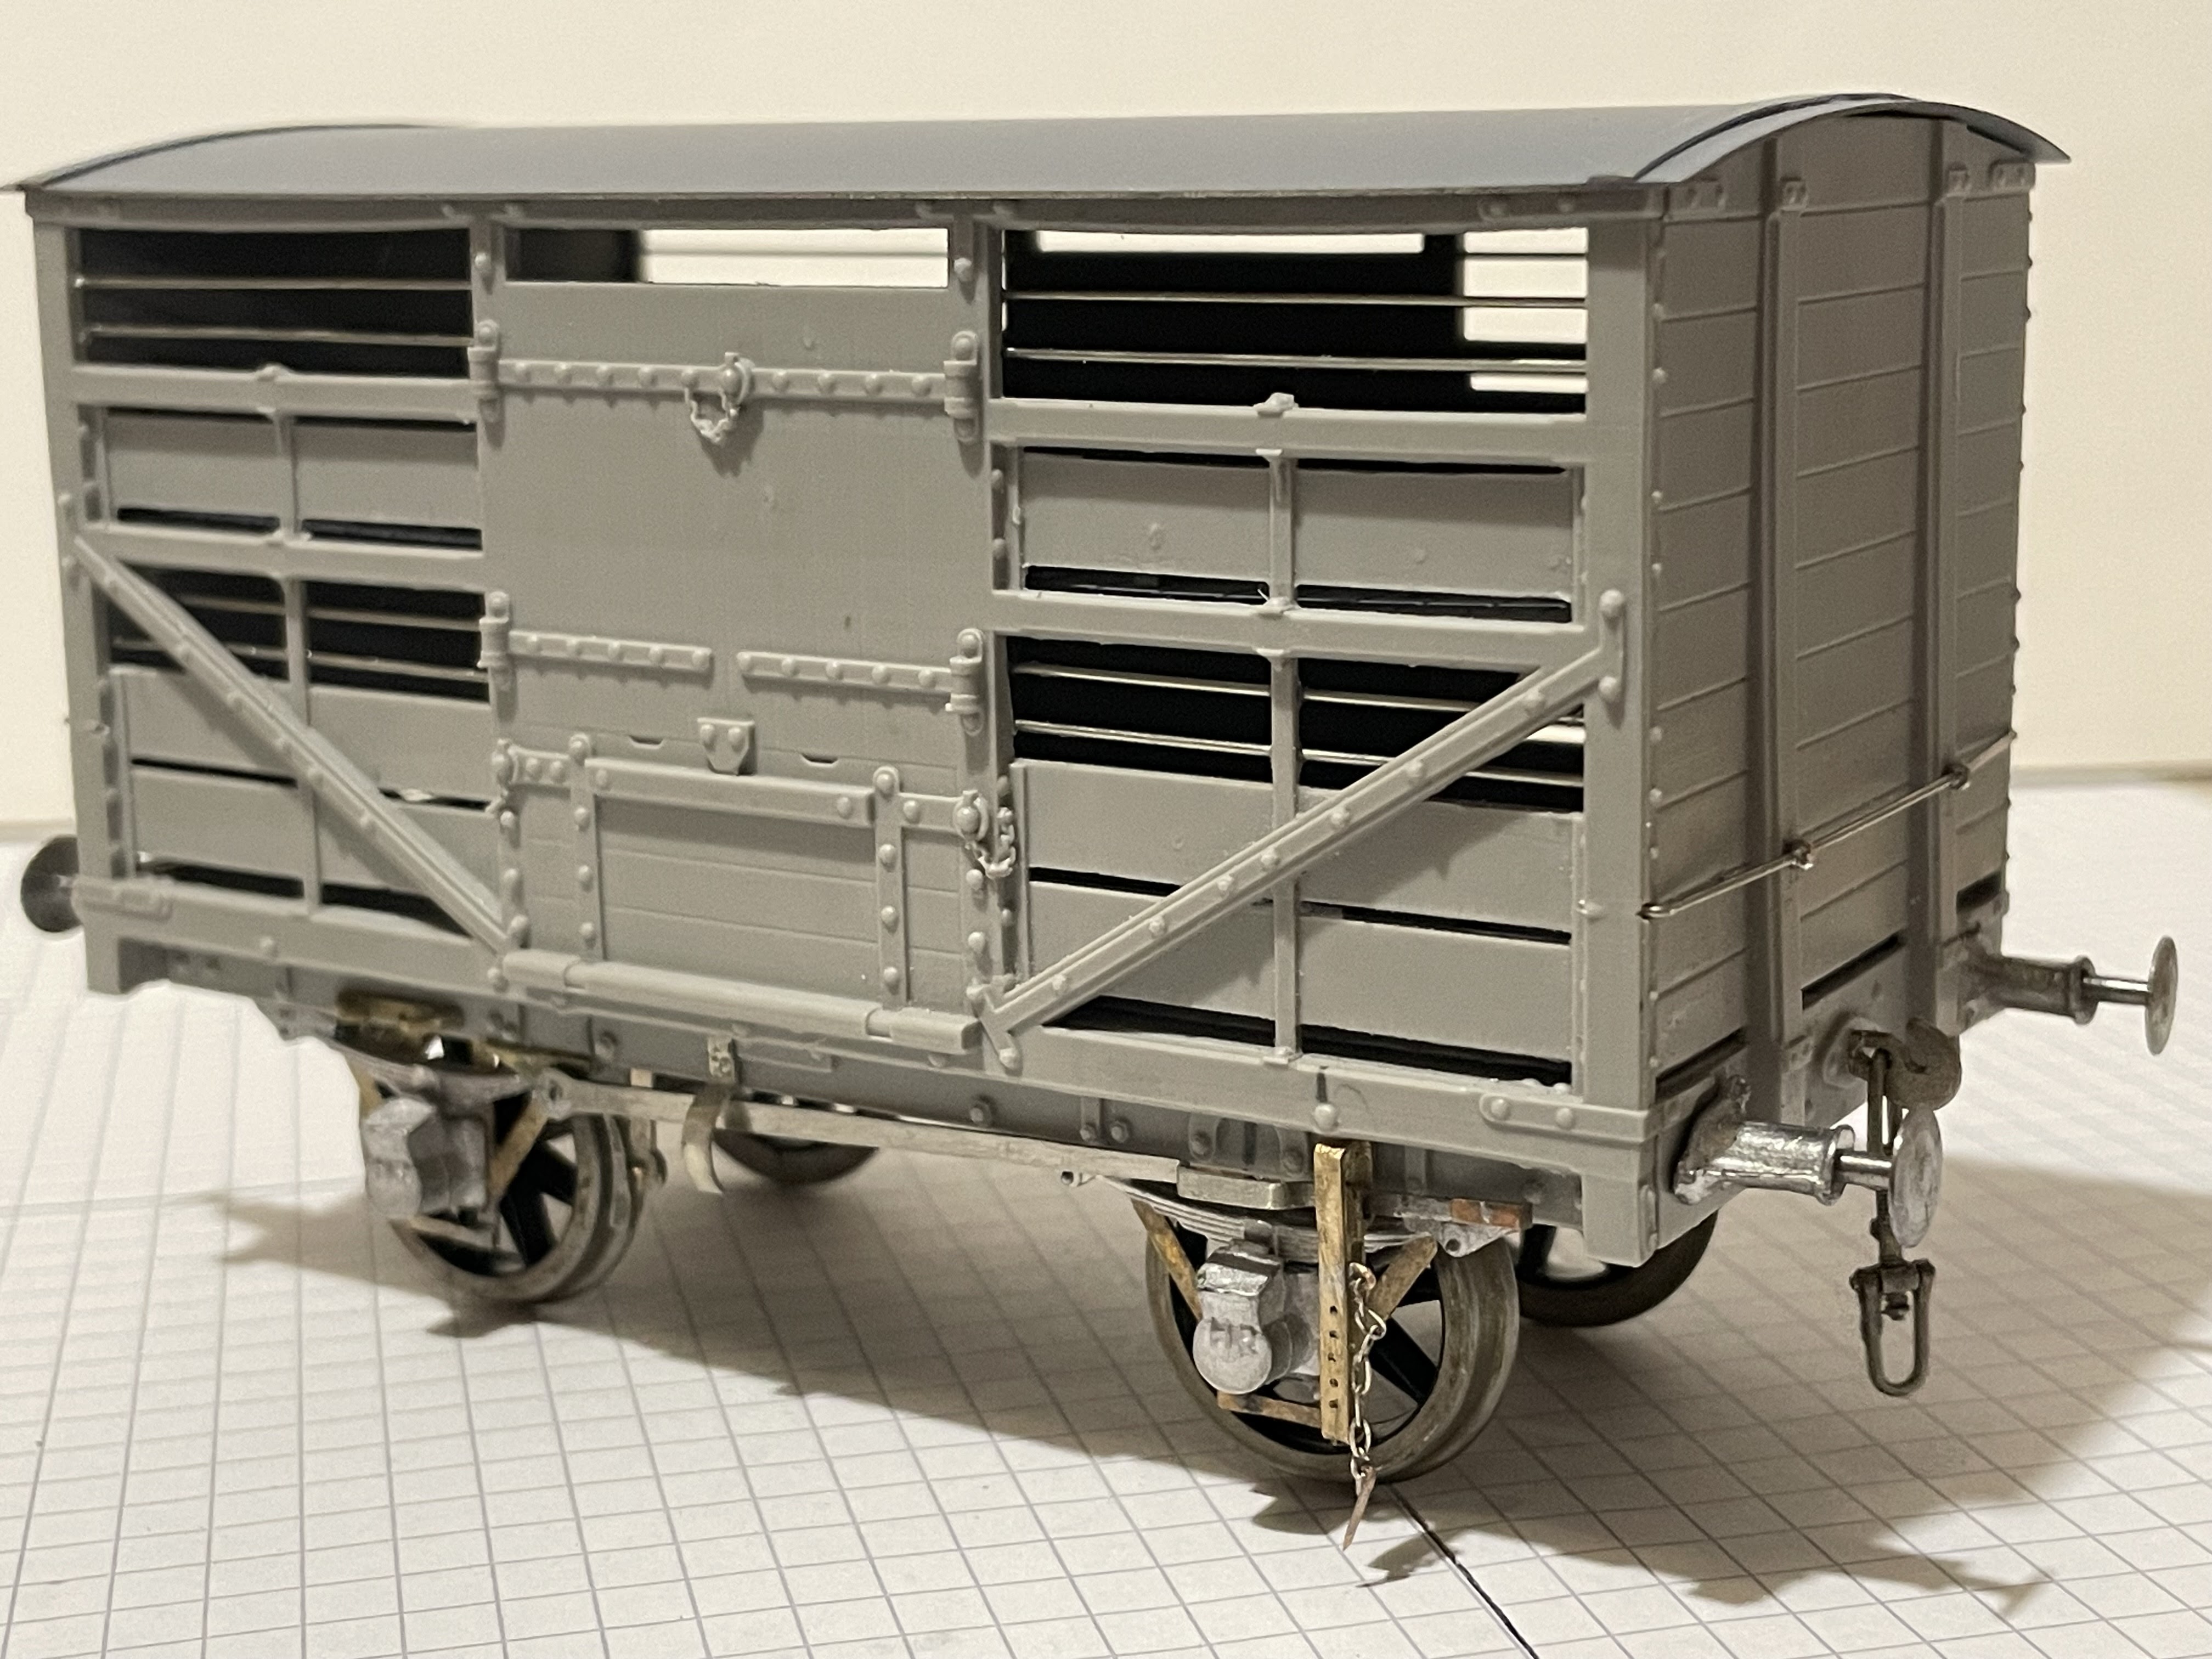
Pete's new addition to his range of aids to scratch-building provides resin sides and ends for a Highland Railway 8-ton double-deck sheep wagon d.17. Parts from the trade, such as the W-irons, buffers, springs, axle boxes and couplings are easily sourced (see below). Additional items such as brake gear, roof and internal floors can be cut from sheet metal or Plastikard, so in a round-about way a multi-media kit is assembled to each individual modeller's choice. 

Price is £22.50 plus postage at cost £1.60 1st Class or £1.15 2nd Class.
Buy 2 or more and postage is Free.

Contact Pete on...
armstrongps1@gmx.com
017687 71302
07342 617 813

This is what you get...


The openings are filled with a thin membrane. Hold to the light to identify the openings and push out the membrane with the back of a scalpel blade, it only takes a few minutes. The resin ingates (with holes in) are cut off with a fine coping saw and the bottom of the castings filed flat. 

In addition you'll need...

Slater's 3' 1" wagon wheels ref: 7120
Slater's 1mm Plastikard, 7mm planking and 1.5mm strip for battens.
W-irons from Slater's or The Highland Railway Society.
Springs, axle-boxes and buffers from Invertrain.
Couplings from CPL Products.
Horse hooks, brake lever guard and collarless hand rail knobs from 62C Models.


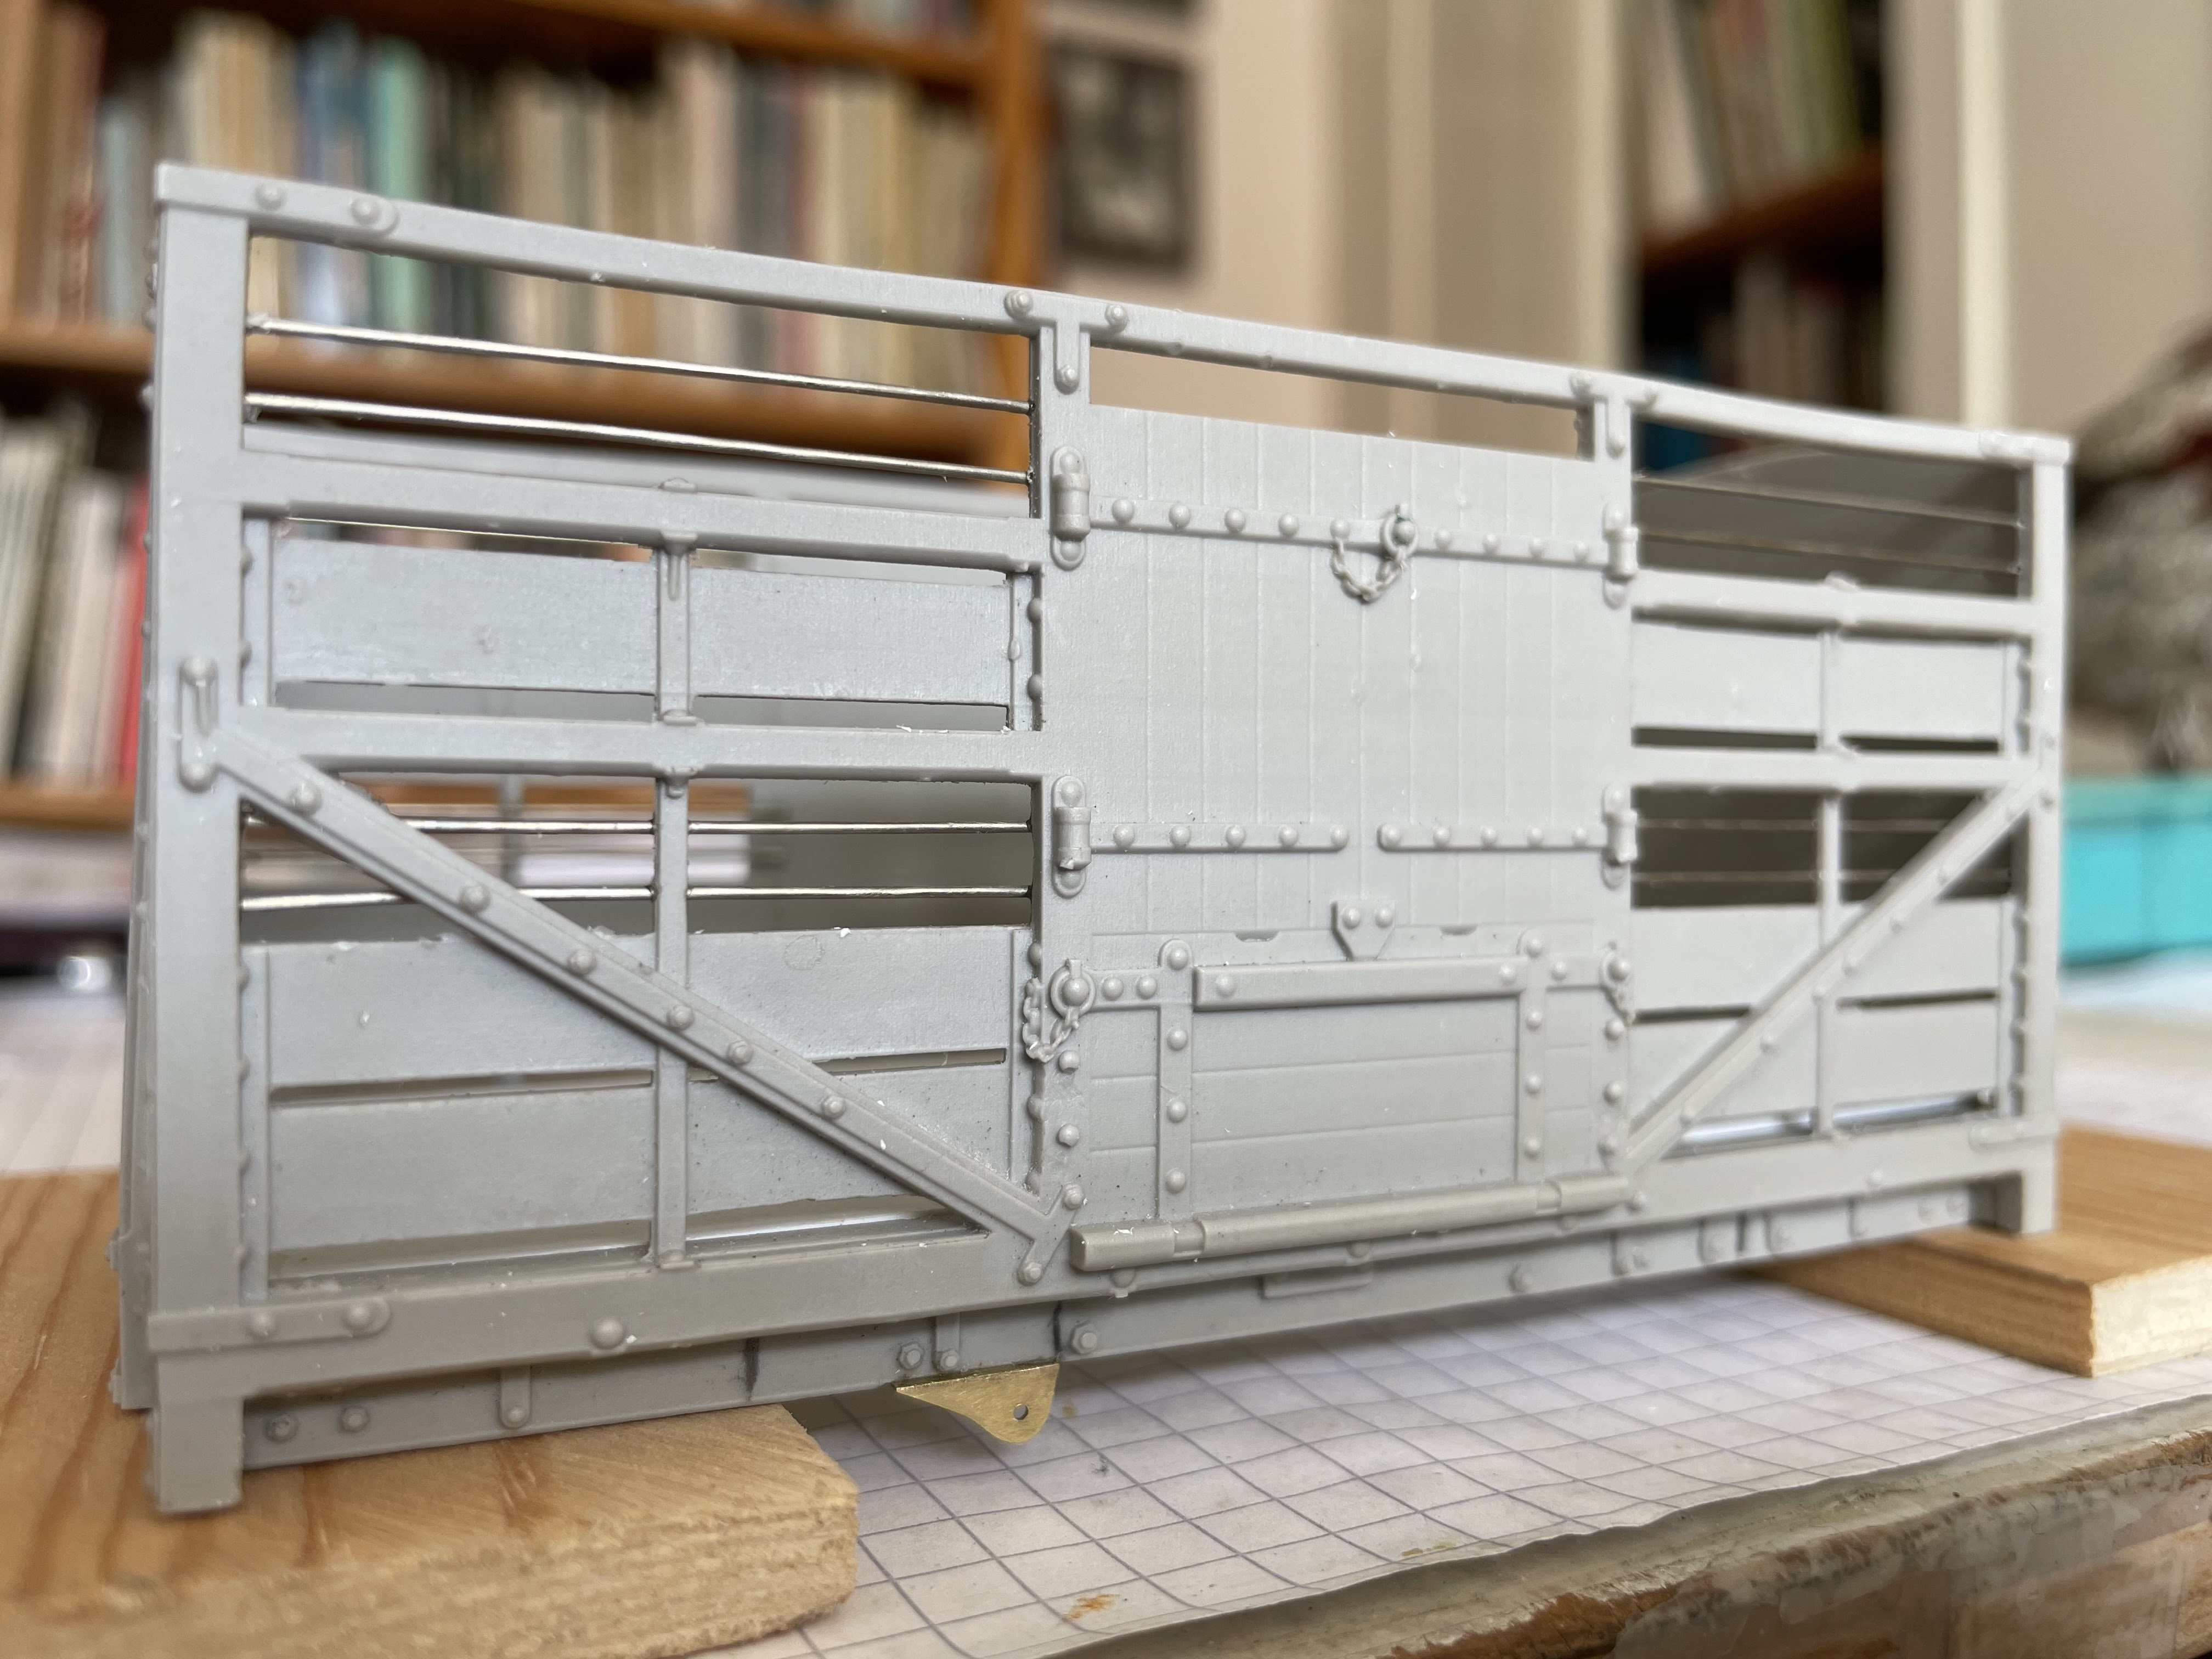
Close up showing the fine detail of the resin castings after the openings have been cleared of membrane. Horizontal bars are made from 0.6 nickle silver or brass wire glued into slots behind the openings.


The upper floor sits behind the horizontal midway strut and serves to brace the structure. The roof is made from 0.4mm nickle silver sheet, rolled to shape; Plastikard would provide an alternative solution.    

 Plastikard planking, with 1.5mm battens to provide a footing for livestock, overlays the 1mm thick lower floor. Note the interior detail and the horizontal wire glued in slots across the openings. The ends of the planks marked with an X have been trimmed slightly to seat the end.

View of the rocking-axle, coupling and buffer shanks, which run in slots behind the solebars. The floor under the axles has been built up 1.5mm with Plastikard sheet to provide the correct ride height.

The upper deck of the van is split in half along its length to allow it to seat in place; an overlay of battened Plastikard planking sits on top of this. The planked floors show up well in good light, even with the roof in place and are worth the effort of detailing them with battens.

 An additional, though optional detail, is the chain which holds the pin which locates in the holes in the rack to hold the brake lever down. 

Brake shoe and brake lever are fabricated from nickel silver sheet. Springs and axle-box are cast in white metal from my own master patterns in my workshop.
 
 
The sides and ends are glued together and 0.6 n/s wire is fastened behind the opening in slots provided; which may need enlarging a little. The ends of the horizontal planks need trimming slightly inside, to allow the sides to seat in place.


A short length of square section tube has been fashioned to make the brake lever hanger, this is glued into a shallow slot cut in the sole-bar.


The horizontal handrail is held in place by collarless handrail knobs which locate into holes in the uprights. The handrail is soldered to the knobs in situ then the assembly is removed, the wire bent to fit the outer holes and replaced.


The van is weighted up to 150g and runs superbly. Note the brake lever guard set just off-center on the sole-bar. There doesn't seem to be much room for a cast number plate on the narrow sole-bar, perhaps sheep vans made do with numbers painted on the lower horizontal boards.  


Thursday, 2 February 2023

Swivel Cradle Wagon complete

7 Ton Swivel Cradle Wagon photographed in LMS days.
Photo HRSoc Collection/Am Baile


Built from my own "Aids to Scratchbuilding", the resin castings for this wagon include the sides, ends and the swivel cradle. The upright stanchions are white metal castings from my own workshop. Buffers, axle boxes and springs are commercial castings from Invertrain, other parts are made from n/s strip. The turnbuckles and fastening chains are from CPL Products.


The load fastening chain and turnbuckle are anchored to an eye bolt on top of the metal corner reinforcement. On the deck can be seen the angle-irons that restrict the rotation of the swivel cradle. There's a sledge hammer that's been left on the deck too.


An metal eye serves to attach the upright stanchion to the corner plate by means of a short chain.

Running as a pair, No.908 which is a known number and 907, which is probable. 


Castings for the swivel cradle wagon are Sold Out now, however Pete has plans to produce more resin sides and ends for Highland Railway wagons. The first of these sets of castings will be for a...

Drummond 8-ton 4-plank mineral wagon to HR d. 10

If you yourself would like to suggest a subject for Pete to include in his range please let him know, I'm sure he'd be pleased to oblige.


Sunday, 25 April 2021

Drummond Drop-Side Fish Wagon, Resin Sides and Ends.

Pete's latest Aids to Scratch Building have just arrived from the casting workshop and they look just as crisp and well detailed as usual. These latest additions to the Highland Railway range are sides and ends for a Drummond open fish truck with drop sides, based on the drawing on page 139 of Peter Tatlow's "Highland Railway Carriages and Wagons", which you will need as reference to complete the model. The additional parts needed are available from the trade, so in effect you're creating your own multi-media kit and all the components are your own preferences. Some parts, such as the brake lever and handles, can be simply cut from n/s sheet or in the case of the underslung vacuum cylinder, built up from metal tube, sheet and rod. You might find a few parts in your spares box too, I found some etched brakes and hangers which saved me cutting them out of sheet as there are eight of them needed for this wagon. As these fish wagons were designed to run in passenger trains the braking arrangements, as can be seen in the accompanying photo, were more complex than on a simple open goods wagon, which gives these wagons much added interest. 


 I have not come across a picture of a Drummond fish wagon in Highland Railway livery so can only show one in LMS days. In earlier times, as HR No.1867, the wagon would have carried Highland green livery with yellow lettering. (DLG Hunter)


Aids to Scratch-Building, sides and ends for a Drummond Fish truck.

The parts are available right now as detailed below...

Resin sides and ends £20.00 per set, plus postage at cost £1.29 (UK)

If you buy 2 sets then they're post free.

Buy three or more and there is a discount of 10%.


You can email, 'phone or message on...

armstrongps1@gmx.com

017687 71302

07342 637 813

Suggested parts and suppliers...

Wheels: Slaters' 3ft 7" Mansell disc coach ref. 7124

Buffers: HR Short Web. Invertrain

Springs: Slater's Plastikard

W-irons and brakes: Slater's Plastikard ref: 71551

Axleboxes: Invertrain

Couplings: CPL Models or LGM 9-008

Safety Chains & Hooks: LGM 9-006

Brake Cross Trees x 4: LGM 36-006

Vacuum Pipes: LGM 32-010 or 62C Models: LWB113

Westinghouse Pipes: 62C Models: LWB108 

Structural Members: Plastruct

Floor & Deck Planking: Slater's Plastikard


There are tongues and grooves on the wagon corners to assist assembly, so I assembled the sides and ends dry, then ran ZAP Medium glue inside the corners. When dry and firm I dropped a floor cut from 1mm Plastikard into place between the sides. When all was set firm I found there was a slight twist to the structure which I corrected in a bowl of warm water, all is square and solid now so I will add structural bracing next under the floor using Plastruct Styrene Strip 2.5 x 6.4mm (90779).

Sides and ends assembled with Plastikard floor


The Plastruct beams under the floor add structural strength, they are not intended to be prototypical.


Brake Cylinder and linkages in position.


As my scrap box was deficient in useful parts I made the brake cylinder and linkages from brass tube,  sheet and rod as a separate module, on a small base of its own, which will glue into place later. The w-irons and wheels will be fitted next then the rest of the brake mechanism. 

The following pictures show the completed wagon underside, all components were sourced as suggested above. The etched clasp brakes, all eight of them, came from my scrap box and I do not know their provenance. I mounted them on 0.45 n/s sheet, to make them a respectable thickness, then cut them out, repositioning the brake shoe at the same time to fit their situation. The vertical brake legs were soldered onto a piece of "L" shaped brass so they could be glued in place on the wagon bed. Slaters offer a possible solution to the w-irons, brake cross-trees and the clasp brakes with their... 
Van Type 3' 7" Dia. Wheels, Compensating Etched W-Irons Ref: 71551.
I've not used this etch yet, though I intend to do so when I build a second example of the truck, I think it will provide the answer to most of the parts below the solebar, though not the cylinder and cross-shaft assembly.


Underside complete


Here you can see how I attached the vacuum and Westinghouse brake pipes to the wagon. The pipes are extended under the wagon and soldered to "L" shaped supports glued to the wagon bed. 


Close-up of the hand brake arrangement and the under-slung vacuum cylinder

Drummond Fish Truck complete. 

I used Phoenix P725 HR Mid Green (1875) with a liberal addition of matt black as the basic colour of the truck. Transfers are HMRS sheet 20 Methfix and Modelmaster 7PCS 1 water-slide, which are available from the HRSoc. A light spray with a dilute weathering mix completed the job. 
Note that Phoenix P727 HR Dark Green (1885-1912), is no longer available, I think the earlier green mixed with black achieves the same colour. I have not made a number plate for the truck as these vehicles do not appear to have carried them.


Tuesday, 29 December 2020

HR Swivel Cradle Wagon Resin Parts in 7mm scale.


These accurate 7mm scale resin castings are designed to take the strain out of building a HR swivel cradle wagon, they are not a complete kit, they are aids to scratch building, they are the difficult parts of the wagon. Everything else needed to complete the multi media model can purchased from the trade or can be simply hand made. Below I'll show you how I completed the wagon, my build is not compensated, there are no rocking w-irons or sprung axleboxes, however these could be contrived, it's up to you how you complete the model.

Price for one set of resin parts...£22.50 plus p/pkg at cost £1.50

Order a pair and it's post free.

Order 3 or more and discount is 10%. 

Contact Pete on...

armstrongps1@gmx.com

07342 637 81

Or by mail at..

21 Manor Park

Keswick, Cumbria,

CA12 4AB


The wagon bed is made from Slaters 7mm planking glued to a thickening sheet of 1mm Plastikard. The deck fittings are made from the drawings of this wagon on page 161 in Peter Tatlow's book, Highland Carriages and Wagons, the drawing is essential in order to complete the wagon. Buffers are HR single web type available from Invertrain. The underframe cross members are made from Plastruct 90779 styrene strip, the central section has a sheet of lead inserted for weight. The brake lever suspension point is only needed on one side so the extra one is removed.


The cradle is in place on the wagon bed, the brass corner eye bolts were purchased from Prime-Miniatures. I made a stanchion by turning a length of rod to shape using a file and an electric drill, the little eyes for the retaining chains were added later. I suppose I could have made all four this way but as I had some silicone rubber to hand I made a mould and cast the rest. Tensioning rods, made from 0.6mm nickle silver wire, can be seen in place alongside the cradle side members. The cradle swivels on a central 12BA brass nut and bolt.


I made two wagons as examples as I think they probably worked in pairs in service. The combined w-iron, spring and axle box castings are from my own master patterns, cast in silicone moulds in my workshop. It's a simple expedient and both wagons run very well indeed without compensation. Couplings are hand made, the hook being cut from 1.25mm nickle silver sheet and the links formed on a jig from 0.8mm wire. Suitable couplings, which match the square holes in the buffer beam, can be obtained from CPL. Horse hooks are brass castings which I source form 62C Models along with the brake lever guides, which can be seen to better effect below. I have added a few holes and the pin, which goes into these, dangles on a fine chain attached half way up the guide.


The simple one piece castings were drilled for Slaters' axle bearings then glued to the solebars with the axles in place, providing the axles are parallel in all planes the wagon will run smoothly. Castings similar to these can be obtained from Invertrain.


The brake arm and shoe was cut from 0.7mm n/s sheet and the brake lever from 0.45mm n/s. Retaining chains have been added to the stanchions and the chains, turnbuckles and hooks that secured the load can be seen attached to the corner eye bolts, these can be obtained from CPL Products.  


Watch this space for a picture of the painted wagon complete with number plate. 


Friday, 23 October 2020

HR 123 Loch an Dorb.


Loch an Dorb, from the Gallic meaning possibly Loch of the Minnows or more likely Loch of Troubles. The model is complete now apart from coal in the tender which I have in hand. The basic colour is Precision P727 which is now no longer available, I only have enough left for touching up now. Etched number plate, name and buffer beam transfers are from Guilplates, the latter are no longer available either. Footplate crew are my own sculpture, designed for this particular engine and now available from Invertrain. 


The cab interior is as complete as I can make it, I took the details from the drawing in Peter Tatlow's "A History of  Highland Locomotives". The backhead casting and many of the small fittings are from LGM though both have been modified to suit. 


Cab interior and crew with the roof removed for a better view of the works.


The superstructure owes a debt to some specially commissioned nickle silver etches from Lochgorm Kits, the chassis however was scratch built. Wheels are cast and turned by JPL Models as Slaters have no correct ones in their list. Motive power is provided by an M1833 motor mounted in an ABC Gears Mini Gooch gearbox. Loch an Dorb's debut on the club layout in Carlisle will be much delayed I fear by the renewed Coronavirus outbreak, I won't be going up to the clubroom this side of Christmas and probably for some months after, neither will I be able to photograph her in a realistic setting hauling a train, she'll just have to wait.

Saturday, 7 December 2019

Two NER Goods Brake Vans.

NER V1 Brake Van from the low end. Note the chunky couplings, position of the end hand-rails and the roof hand-rail.

These NER goods brake vans are both from kits by Connoisseur Models, designed by Jim McGeown, and though they build well I have made a few changes and improvements to them which I detail here.
I had to hand Ian Sadler's book "NER Brake Vans" and used the photos and drawings as reference...

I removed the front panel from the centre of the topcote as I found no evidence for it.

The position of handle of the left hand side door was wrong and was changed as the doors slid only one way, towards the low end.

The end hand-rails were soldered into the sides of the vertical end baulks rather than into the front of them.

I replaced the feeble coupling hooks supplied with more chunky ones I made myself from 1.25mm nickle silver sheet.

I made a floor for the van and arranged a long screw through it to hold the roof in place.

Some metal was removed inside the topcote to add realism and an inner cross wall added which strengthens the structure.

Underneath the van I made an elbow which links the brake yokes and supports the rod to the central brake pivot.

I added a roof hand-rail on the low end though it is not soldered to the end, so the roof remains removable.

I didn't use Jim's method of springing the buffers and coupling; these are individually sprung.

4mm scale hand rail knobs were drilled 6mm and support the side hand rails.


NER V1 Brake Van from the birdcage/topcote end

Underside details are similar for both V1 and V4 vans. Note the elbow joining the brake yokes and the individually sprung buffers and coupling

Interior of V1 Brake Van with cross-wall. Much metal was removed from the top edge of the sides inside the top cote.


The photos in Sadler showed that the side lamp should be positioned on the roof of the side lookout, so the bracket supplied in the kit was dispensed with.

Inside veranda ends were made from Slaters' Plastikard planking.

I soldered metal strip to the roof edges and to the footboards to beef them up to a more realistic thickness.

Square tube was added to the veranda corners to simulate the thickness of these uprights. The door was made in the open position; this is the rear of the van where the guard figure will be positioned later. I made a pattern for an NER brake van lamp which will be produced by Invertrain next year; a trio of them will ultimately grace the rear of this van.

A floor was added and drilled for a long screw, which passes through the floor to hold the roof firmly in place.

The etched veranda safety bars are fragile and rather vulnerable so I modelled only one in place across the entrance, the others are held in their housings.

Lamp irons are from Slaters as I found the etched ones supplied just didn't work.

An etched number plate has been commissioned from Guilplates. NER lettering and numbers for the sides will be a mixture of transfers from various sources, which I hope I can make work together. 

NER V4 Brake Van. The couplings are made by myself; the buffers are independently sprung. 

NER V4 Brake Van. Note the safety bars in two positions. The lamp on top of the side lookout has been improved with a realistic red epoxy lense. 


NER V4 Brake Van from the rear/open door end. The guard figure has yet to be added to the veranda. Note the Plastikard inner planking of the front veranda. NER pattern brake van lamps will be available from Invertrain soon, to add a final flourish to the van. 

Tuesday, 15 October 2019

Highland Railway 13Ton Type C Goods Brake Van


In a recent article in the Highland Railway Journal I mentioned that despite modellers of the Highland Railway being well served by kit manufacturers, a gap existed in the case of the Type C van. Remarkably, within weeks of publication, the gap was plugged and a sample of the kit was on my work bench. The kit was designed by Mike Williams and commissioned by Chris Smith of Invertrain.

This is a difficult kit, or you could call it a basic kit or an aid to scratch building. Whatever you call it, the kit demands patience and effort, it’s a project for the experienced modeller.

The panels have been etched into the sides and ends of the bodywork which leaves them flimsy, it may have been a better idea to have designed the sides with a separate surround to the panels, designed to be soldered on, which would have made for a more robust

body. As it is, some reinforcement and bracing is needed to produce a satisfactory structure.

I made a floor for the van and built the body and chassis as two separate modules that screw together. The chassis has a simple rigid wheelbase, without compensation.


The chassis is a separate module. Note the cross members, which support the brake hangers.


The transverse veranda locker was not part of the kit so I made one myself, which improves the appearance of the model and strengthens the structure. I double skinned both the ends and the sides of the veranda interiors, which both thickens the van walls and simplifies glazing the ends, the clear acetate sheet simply slips between the inner and outer skin. The inner end walls of the verandas are faced with 2mm Plastikard planking overlays, the side walls are not planked. The interiors of the glazed verandas are dark when the roof is in place so really you can get away with much less detail than I included, though a minimum would be to make the transverse locker and to thicken the top of the door and the opening above.


The van body is a separate module. Plasticard planking is used for the inner end walls and for the veranda floors.


There are flaws in the design which need correcting. In particular the ends of the buffer beams require shortening and an insert needs to be made to seat the ducket sides correctly. The instruction sheet, which is useful without going into minute detail, makes it clear how these improvements can be made. I used Slaters’ cast lamp irons in place of the etched offerings in the kit and also discarded the roof which was half etched and far too thin; I made a replacement from 0.45 sheet and doubled the thickness of the edges. The roof is removable, to allow glazing of the van after painting and is held in place by a screw which fits neatly down the chimney and locates into a longitudinal member in the cabin. 
There is ample scope for ingenuity in making adjustments and additions to the kit and obviously the more input and effort you put into the model, the better will be the end result


HR Type C goods brake van complete and ready for painting.